
I grew up in a family of craftsmen, artists, and do-it-yourselfers. This DIY spirit carries over into my photography. I’ve always been drawn to “novelty lenses”—lenses that create a unique look but aren’t typically used for professional photography. I’ve collected a few that fit this description and plan to explore their qualities on this blog soon. But for now, I’ll focus on the DIY project that kept me busy all summer.
A few months ago, I came across an ad for a camera lens made from repurposed lenses taken from disposable cameras. The photos in the ad had that nostalgic disposable camera aesthetic: saturated colors, soft focus around the edges, and a gentle bloom around lights—qualities typically found digitally in Instagram filters or vintage-look phone apps.
This DIY spirit carries over into my photography. I’ve always been drawn to “novelty lenses”—lenses that create a unique look but aren’t typically used for professional photography. I’ve collected a few that fit this description and plan to explore their qualities on this blog soon. But for now, I’ll focus on the DIY project that kept me busy all summer.
A few months ago, I came across an ad for a camera lens made from repurposed lenses taken from disposable cameras. The photos in the ad had that nostalgic disposable camera aesthetic: saturated colors, soft focus around the edges, and a gentle bloom around lights—qualities typically found digitally in Instagram filters or vintage-look phone apps.
I considered paying the $50 asking price for the lens in the ad, but I knew it wouldn’t be as satisfying as making it myself. The first step was ordering a disposable film camera, which was easy since they’re still available. I ended up buying a Fujifilm disposable camera that expired in 2001. Since expired film has its own niche in photography, I was curious to see what kind of results I could get from film that was 13 years past its shelf life.
I carried the camera with me everywhere, looking for interesting subjects to photograph. I didn’t want to rush the process, so I took my time, capturing scenes that matched the vintage character of the camera. I visited cemeteries and historic sites, places that resonated with the nostalgic feel I was aiming for. When I finished, I dropped the camera off at my favorite camera store in Milwaukee, Art’s Camera, and requested the return of both the camera and the negatives.
I was thrilled with the results from the expired film: the colors were intensely saturated, the grain was large and chunky, and while some areas were sharply focused, most were soft and difficult to discern. I was pleased with the outcome, but for now, this wraps up my experimentation with expired film.
 | 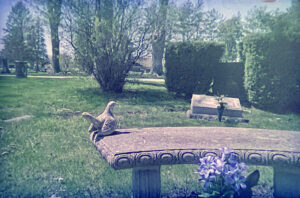 |  |
| Here are a few of my favorites from the disposable film camera. | ||
With an empty disposable camera in hand, I began the satisfying task of dismantling it. I tore apart the camera until all that remained was a pile of plastic and circuitry. The lens was easy to remove; it had its own plastic mounting that came out effortlessly. It was secured by a circular retainer clip, which I intended to keep for easy mounting to my camera’s body cap.
I researched how to mount the lens properly and determine the correct distance from the sensor. One video I came across was somewhat discouraging; the photographer mounted the lens without adjusting for focusing distance and ended up with unfocused photos. While he accepted this as a common outcome in DIY projects, I wasn’t satisfied. I knew I needed to experiment with the focusing distance before securing the lens to ensure I achieved in-focus photos.
I used a rotary tool to trim the plastic mounting around the disposable camera lens and drilled a sizable hole in the body cap. By using museum wax to position the lens over the hole, I could adjust its placement to ensure it was centered. I also used rubber washers to adjust the lens distance from the sensor until I achieved the desired sharpness. Finally, I used super glue to permanently affix the lens to the body cap.
Looking at it now, it’s far from attractive and nowhere near as polished as the version in the ad. But none of that mattered because the project was a success. Now it was time to put it to use.
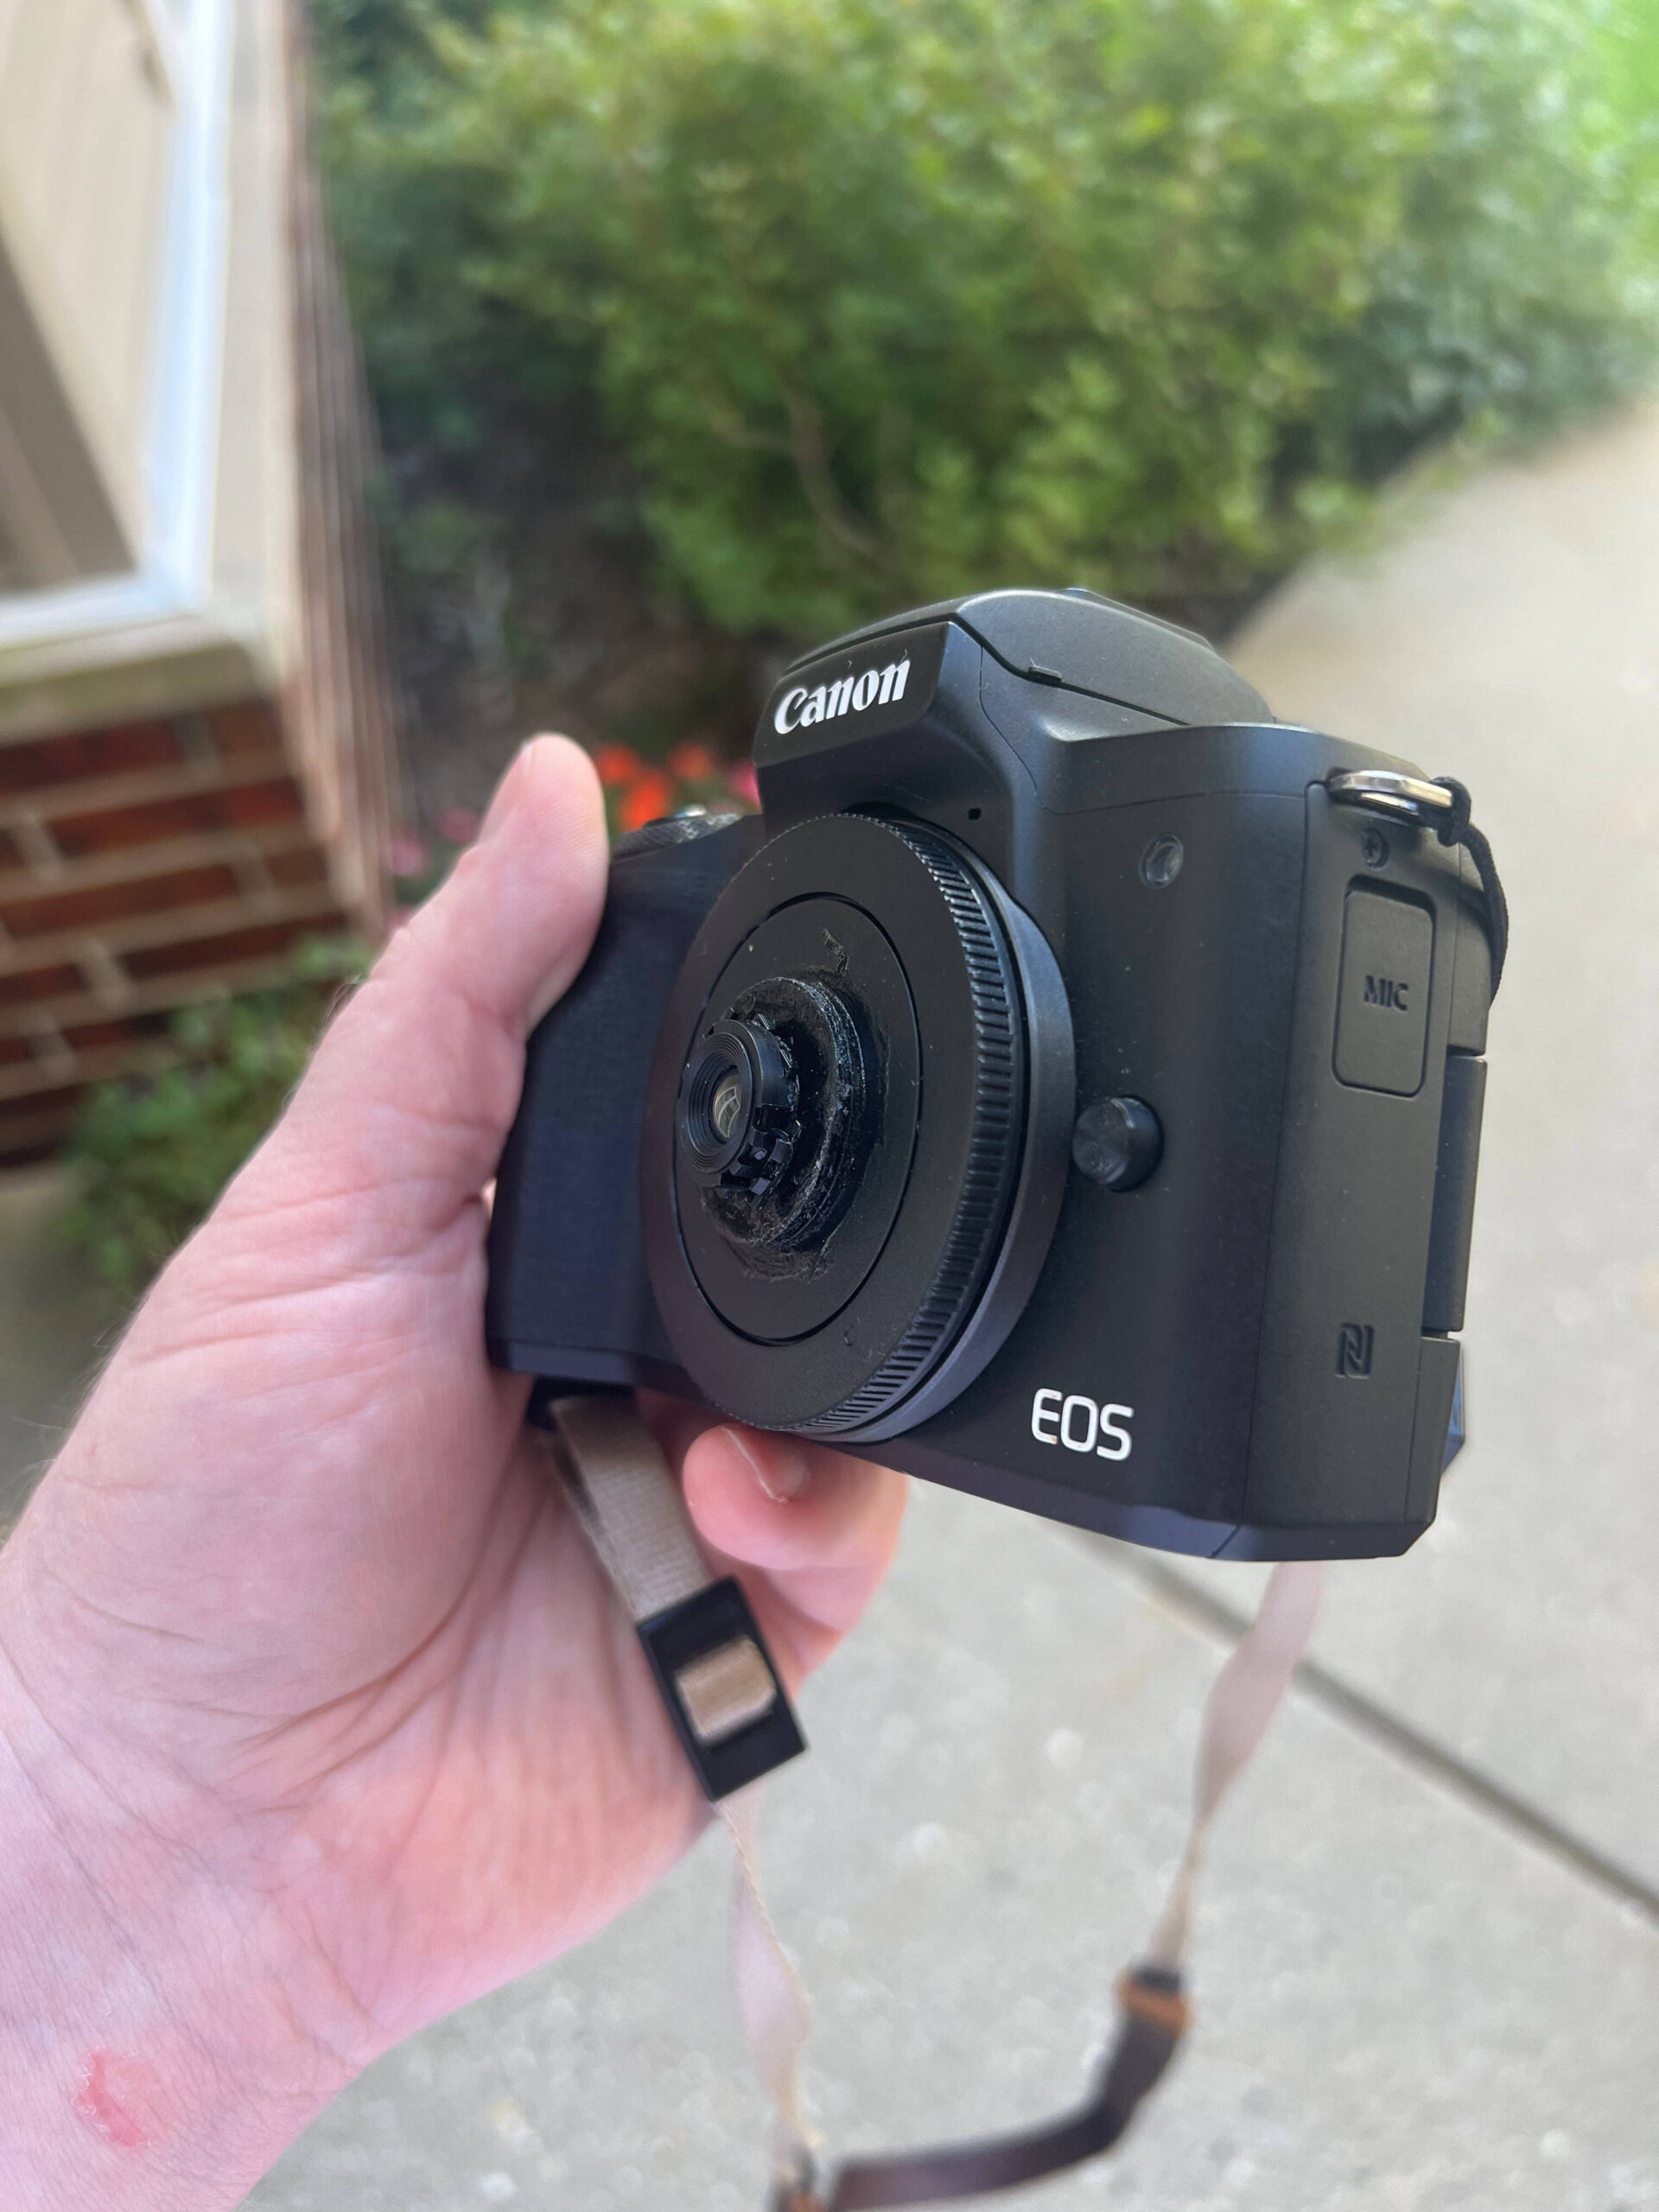 |  |  |
| Results of my disposable lens project. | ||
I took this lens with me everywhere this summer. It was an adjustment getting used to this style of fixed focus, pancake lens. I generally carry an 18-55mm zoom lens so not having the ability to zoom my camera was something I had to get used to. Luckily, my Canon M50 has focus peaking, so I was able to move forward or back until I could visually see in the viewfinder that my subject was in focus. This wasn’t foolproof, of course—I still ended up with photos that weren’t sharp. But this was all part of that DIY spirit.
Visiting friends in Cleveland and Pittsburgh, a quick weekend trip to La Crosse, Wisconsin, the Bristol Ren Faire, and the Wisconsin State Fair all gave me plenty of opportunities to try out my camera.
The first chance I got to test out my novelty lens was at Squire’s Castle near Cleveland. I started by using the camera’s P mode, which simplified the process. By adjusting the ISO and letting the camera handle the shutter speed (since the lens aperture is fixed at around f/8), I could minimize some of the guesswork. At Squire’s Castle, the large open windows and lack of interior lighting created challenging exposure conditions. I had to choose between exposing for the window or the interior and find a way to balance both. In addition to dialing in the settings, I had the advantage of shooting in RAW format, so I could push the contrast in Lightroom, making certain aspects of the photos stand out.
Two standout photos in this set include one of two children: one standing in partial darkness and the other in light. I especially like how the shadows in this image, particularly how the boy on the right casts a shadow along the brick that mirrors the shadow created by the archway above. In contrast, the boy on the left, partially in darkness and stepping into the light, has a glowing effect on his orange shirt and white skin, thanks to the unique nature of the lens.
Another standout photo doesn’t feature people but rather two windows overlooking the field in front of the castle. I especially like the bloom created by the light coming through the window on the right. The interplay of light and dark, along with the external bloom, beautifully illustrates what I hoped for with the disposable camera lens. The color is much bluer than what I would expect from a standard camera lens, resulting in a cool effect.
 |  |
| Squire’s Castle Cleveland, Ohio | |
During that same trip to Cleveland, we visited the Asian Lights Festival at the Cleveland Zoo. I captured some of my best photos there using the disposable camera lens. The unique beauty of these shots came from being there during the golden hour, which added a warm, natural glow. However, this also meant I had to be more meticulous with the camera settings. I shot in shutter priority mode with an ISO of 3200, and my shutter speeds ranged from 1/50 to 1/120. While this did introduce some camera noise, I was able to reduce much of it in post-production.
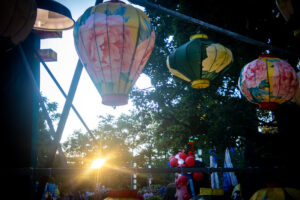 |  | 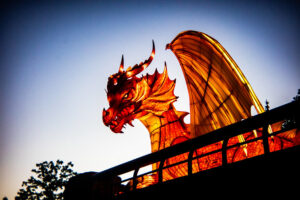 |
| Asian Lights Festival – Cleveland Zoo | ||
Overall, I really enjoyed this camera project—it energized me and challenged me to think about photography in a new way. I’ve often considered buying a proper pancake lens for my M50, but this experience taught me that the limitation of not being able to zoom can actually be a creative advantage. It forces you to approach composition differently. I even got a few curious looks while taking photos; one person pointed out that I “didn’t have a lens on my camera.” It felt rewarding to explain that I had made the lens myself.
I highly recommend this experience to any photographer looking to enhance their compositional skills. If you have a do-it-yourself spirit like I do, try making one yourself from a disposable camera. If not, there are plenty of pre-made options available—there’s even one shaped like an Oreo cookie!
I grew up in a family of craftsmen, artists, and do-it-yourselfers. This DIY spirit carries over into my photography. I’ve always been drawn to “novelty lenses”—lenses that create a unique look but aren’t typically used for professional photography. I’ve collected a few that fit this description and plan to explore their qualities on this blog soon. But for now, I’ll focus on the DIY project that kept me busy all summer.
A few months ago, I came across an ad for a camera lens made from repurposed lenses taken from disposable cameras. The photos in the ad had that nostalgic disposable camera aesthetic: saturated colors, soft focus around the edges, and a gentle bloom around lights—qualities typically found digitally in Instagram filters or vintage-look phone apps.
I considered paying the $50 asking price for the lens in the ad, but I knew it wouldn’t be as satisfying as making it myself. The first step was ordering a disposable film camera, which was easy since they’re still available. I ended up buying a Fujifilm disposable camera that expired in 2001. Since expired film has its own niche in photography, I was curious to see what kind of results I could get from film that was 13 years past its shelf life.
I carried the camera with me everywhere, looking for interesting subjects to photograph. I didn’t want to rush the process, so I took my time, capturing scenes that matched the vintage character of the camera. I visited cemeteries and historic sites, places that resonated with the nostalgic feel I was aiming for. When I finished, I dropped the camera off at my favorite camera store in Milwaukee, Art’s Camera, and requested the return of both the camera and the negatives.
I was thrilled with the results from the expired film: the colors were intensely saturated, the grain was large and chunky, and while some areas were sharply focused, most were soft and difficult to discern. I was pleased with the outcome, but for now, this wraps up my experimentation with expired film.
| | |
| Here are a few of my favorites from the disposable film camera. | ||
With an empty disposable camera in hand, I began the satisfying task of dismantling it. I tore apart the camera until all that remained was a pile of plastic and circuitry. The lens was easy to remove; it had its own plastic mounting that came out effortlessly. It was secured by a circular retainer clip, which I intended to keep for easy mounting to my camera’s body cap.
I researched how to mount the lens properly and determine the correct distance from the sensor. One video I came across was somewhat discouraging; the photographer mounted the lens without adjusting for focusing distance and ended up with unfocused photos. While he accepted this as a common outcome in DIY projects, I wasn’t satisfied. I knew I needed to experiment with the focusing distance before securing the lens to ensure I achieved in-focus photos.
I used a rotary tool to trim the plastic mounting around the disposable camera lens and drilled a sizable hole in the body cap. By using museum wax to position the lens over the hole, I could adjust its placement to ensure it was centered. I also used rubber washers to adjust the lens distance from the sensor until I achieved the desired sharpness. Finally, I used super glue to permanently affix the lens to the body cap.
Looking at it now, it’s far from attractive and nowhere near as polished as the version in the ad. But none of that mattered because the project was a success. Now it was time to put it to use.
| | |
| Results of my disposable lens project. | ||
I took this lens with me everywhere this summer. It was an adjustment getting used to this style of fixed focus, pancake lens. I generally carry an 18-55mm zoom lens so not having the ability to zoom my camera was something I had to get used to. Luckily, my Canon M50 has focus peaking, so I was able to move forward or back until I could visually see in the viewfinder that my subject was in focus. This wasn’t foolproof, of course—I still ended up with photos that weren’t sharp. But this was all part of that DIY spirit.
Visiting friends in Cleveland and Pittsburgh, a quick weekend trip to La Crosse, Wisconsin, the Bristol Ren Faire, and the Wisconsin State Fair all gave me plenty of opportunities to try out my camera.
The first chance I got to test out my novelty lens was at Squire’s Castle near Cleveland. I started by using the camera’s P mode, which simplified the process. By adjusting the ISO and letting the camera handle the shutter speed (since the lens aperture is fixed at around f/8), I could minimize some of the guesswork. At Squire’s Castle, the large open windows and lack of interior lighting created challenging exposure conditions. I had to choose between exposing for the window or the interior and find a way to balance both. In addition to dialing in the settings, I had the advantage of shooting in RAW format, so I could push the contrast in Lightroom, making certain aspects of the photos stand out.
Two standout photos in this set include one of two children: one standing in partial darkness and the other in light. I especially like how the shadows in this image, particularly how the boy on the right casts a shadow along the brick that mirrors the shadow created by the archway above. In contrast, the boy on the left, partially in darkness and stepping into the light, has a glowing effect on his orange shirt and white skin, thanks to the unique nature of the lens.
Another standout photo doesn’t feature people but rather two pigeons. They’re sitting on an interior window sill with no glass. They’re backlit, creating a glowing effect around their bodies that makes them stand out from the dark stonework around them. These pigeons likely reside in this castle ruin, and I was thrilled with how their placement added an eerie quality to the photo.
Afterward, I made a quick stop in downtown Cleveland to test the lens against some modern architecture and Lake Erie. I took a photo of a chessboard with pieces placed as if a game was about to start, with Lake Erie and an empty picnic table in the background. While this image didn’t turn out quite how I wanted, it taught me that the lens produces a subtle bokeh effect in front of and behind the focus plane. It was time to see what else this lens could do.
From Cleveland, I made my way to La Crosse, Wisconsin, where I visited Grandad Bluff, Riverside Park, and the Shrine of Our Lady of Guadalupe. While the photos didn’t turn out quite as I’d hoped, they did produce some unique results. For example, when photographing the path to the Shrine of Our Lady of Guadalupe, the trees along the path had a blooming effect that intensified the farther they were from the center of the image. This characteristic is typical of this type of lens, adding a unique quality to the photos.
That same blooming effect was even more pronounced when I photographed boats in the harbor at Riverside Park. As the boats reached the corners of the frame, the image grew blurrier and fuzzier, creating a sense of movement even though the boats were stationary. Grandad Bluff provided a stunning panoramic view of the city, with a few photos capturing that sense of blur in a way that makes it seem like the city is moving away from the viewer.
In contrast, the lens produced sharp and clear images when I visited the Bristol Renaissance Faire. The rustic, colorful buildings and costumed participants lent themselves to the lens’s aesthetic. I especially enjoyed photographing jousting tournaments, capturing moments when the horses’ speed created a sense of motion blur that heightened the drama of the event. The lens’s blooming effect also added a soft focus to the edges of the frame, enhancing the vintage feel of the photos.
The Wisconsin State Fair provided a completely different environment to test my lens. The bright lights, vibrant colors, and bustling crowds created an opportunity to see how the lens handled fast-paced action and vivid scenes. I was especially pleased with how the lens captured the bright lights of the Ferris wheel, creating a soft halo effect that gave the photos a dreamlike quality. The bustling crowds also added a sense of movement to the images, even in still shots, thanks to the lens’s ability to blur the edges of the frame.
By the end of summer, I had taken the lens to various locations, capturing a wide range of subjects and scenes. Each photo, whether sharp or soft, added to my understanding of how this DIY lens could create a unique, nostalgic look. This project reminded me of the joy and satisfaction that comes from creating something with your own hands, no matter how imperfect the result may be.
Stay tuned for more updates as I continue to experiment with novelty lenses and other DIY photography projects. I’m excited to share more of my journey with you as I explore the world of creative and unconventional photography.
Disposable cameras first appeared in 1949, introduced by Photo-Pac to make photography affordable. It cost $1.29 (about $16.52 today) and featured 8 exposures of 35mm film in a cardboard box, which users mailed in for processing. In 1966, a French company released a 12-exposure version in plastic. The modern disposable camera was popularized by Fujifilm in 1986, followed by Kodak in 1988, both with a fixed-focus plastic lens. A digital version emerged in 2004, but disposables are still popular today, especially as wedding favors.